Showing posts with label Game. Show all posts
Friday, July 24, 2015
Casuatly/Morale Counter Dial Tutorial
I am into miniature wargaming for definitively aesthetic reasons, and prefer to create the illusion of an actual scene on the tabletop. To represent complex battlefield conditions and the less tangible aspects of the battles, such as morale and command coherency, one must either get heavy into the bookkeeping aspects of the games or use visual markers to note these conditions. Instead of my usual default of dice, I have gone about creating my own dial counters.
Labels:
AWI,
Basing,
Game,
Model,
Redcoats,
Revolution,
Tutorial,
Work in Progress
Thursday, November 13, 2014
Battle of Harlem Heights (Sharp Practice Skirmish)
Following the Battle of Long Island, the Continental Army slipped away from complete destruction across the river to Manhattan Island and New York City. In an attempt to trap them and end the rebellion, Lord Howe landed his army to the north, at Kip's Bay to cut them off in the City. The rebels, however, slipped away again, and fled up the island, with the Crown Forces in pursuit.
Friday, September 5, 2014
Skirmish in the Northeast (AWI Sharp Practice)
Awaiting the coming storm. |
Saturday, August 2, 2014
Petit Armée
One of the best parts of making new gaming friends is the expanding of your games repertoire. My friend Andrew has introduced me to a fun little game in Petit Armée.
Saturday, November 9, 2013
Sunday, October 27, 2013
Sharp Practice Blinds (Hidden Movement Markers)
After playing a few games of Sharp Practice, I was convinced that something more photogenic than cards was needed to represent the movement of hidden troops within the fog of war.
Saturday, July 6, 2013
1812 Sharp Practice Meeting Engagement
Returning once again to the War of 1812, I introduced a combined force of British Regulars with native allies in a game against the US line in another Sharp Practice match with my friend Dave.
Wednesday, May 15, 2013
Rebels' Redoubt: an AWI skirmish with Sharp Practice
Exploring the built-in diversity of the Sharp Practice ruleset for small skirmishes, I ran a game set during the American War of Independence. Dave and I played a scenario that had an outnumbered and outclassed Rebel force holding a dug-in redoubt with one functioning field gun against an onslaught of elite Redcoats.
Thursday, May 9, 2013
Battle with Dark Templar (WH40k)
I recently had the pleasure of running a Warhammer 40K game with my friend Michael, pitting my Valhallan Imperial Guard against his Black Templar space marines, at his FLGS.
Saturday, March 16, 2013
The Wreck of the Dred Hawk
My friend Zach was back from D.C. to visit, and what better chance to catch up than on the tabletop! We decided to play a scenario of Sharp Practice using my Napoleonic Era figures. Here are the highlights (at least the ones that photographed well):
The Royal Navy Schooner Dred Hawk has run aground on the French coast. A patrol of Voltigeurs has spotted the stranded seamen.
Labels:
Brig,
French,
Game,
Historical,
HMS,
Infantry,
Napoleonic
Friday, February 22, 2013
Rescue the Riflemen! (a War of 1812 Game)
It was my privilege to play a War of 1812 game of Sharp Practice with my friend David this last weekend. We have been looking for a good ruleset for a large scale black powder era skirmish game to run some War of 1812, Peninsula War, and AWI games, so far this has been the most fun.
Tuesday, October 23, 2012
Portable Game Table
Though no longer an apartment–dweller, I still face the constraint of storage space for gaming materials, and although I would really like a good gaming set–up with lots of terrain in several scales, I simply don't have the a place to put it all.
I have been sketching out some solutions to the storage crisis of not only various terrain pieces that I plan on constructing, but also the standard 6ft by 4ft gaming surface that so many miniature games share in common.
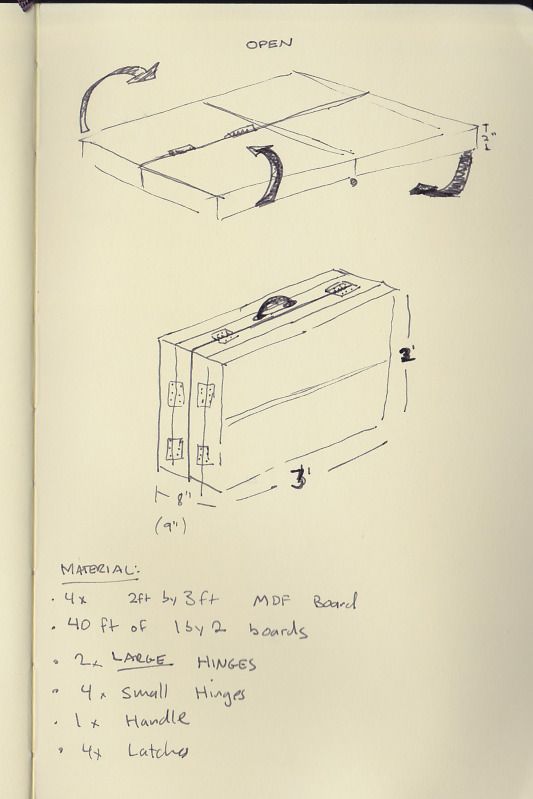
The design I have settled on building is a 6x4 game table with a 2 inch lip/support stretcher all around. The board will fold in half twice, creating a 3ft by 2 ft box, with two internal compartments, where I intend to store trees, hills, crop fields, and buildings. I have some specific plans for terrain that can span several of my main games, but that will be for a separate post. Originally I started on a design that folded in half, minimizing hardware needed, but 3ft by 4ft is bigger than it sounds. I abandoned this plan when I realized that it would be larger than my drafting table! Also important that this fits into my car, or the whole "portable" thing is lost, and my trunk is only 3ft wide at the opening.
Sketchbook in hand, I sped to the local hardware store and purchased one 8x4 piece of MDF hard board. (I may have the exact name of this material wrong), and had the friendly staff there cut it down int the 2x3 sections, with a 1ft strip left over, which will likely serve as a base for future terrain pieces. Supports will use 1" x 2" strips of pine, needing 40 ft total. The most expensive part of the project so far has been the hardware end. Even though I only need 6 hinges, that easily took up the lion's share of the budget. I would suggest scavenging them from preexisting boxes or other found sources if possible.
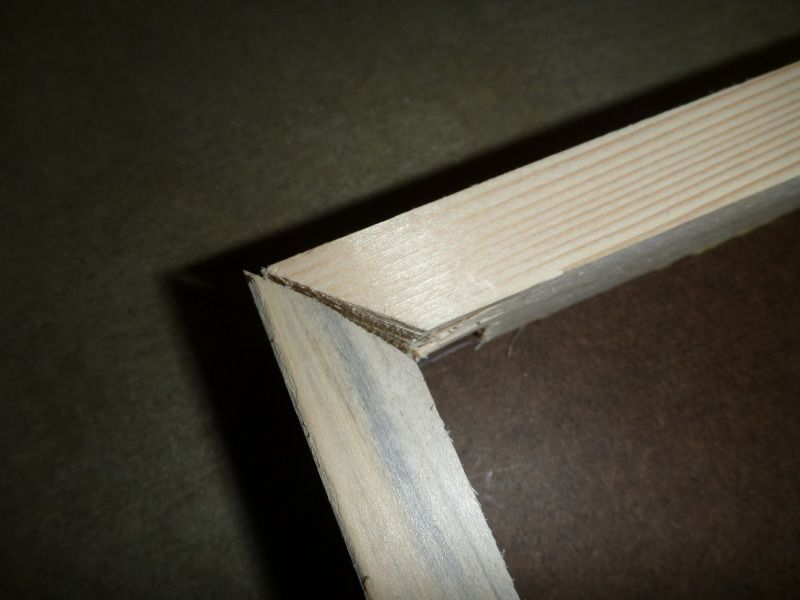
Measuring the Miter |
Back home, I measured out my frame using the hardboard surface itself as my template, to ensure as good a fit as I can manage. Though not strictly necessary, I opted for a slightly better finish, and mitered the corners for a prettier join. On the sections that finished properly, this looks really nice. I did, however, have some difficulty with my hand saw and mitrebox at some points.
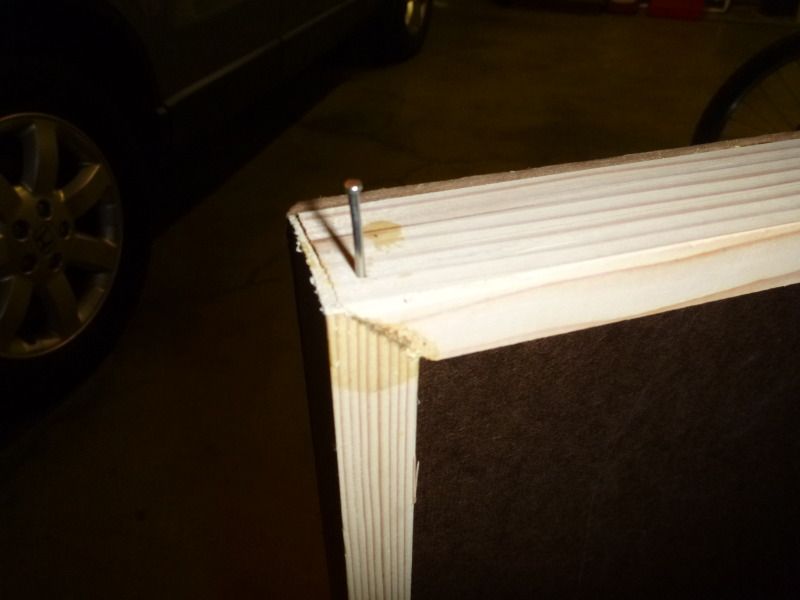
In need of a shim. |
After I started to make better use of my C–clamps, the corners started to turn out better. The board surface is attached to frame using small brass tacks and carpenter's glue. I;m a little wary of the tacks being strong enough, but anything more splits this wood, since I went for the "normal" wood and not the "premium" wood.
Strengthening the corners by putting some larger tacks into the long board. |
Having completed my first board, I'm considering my methods, and preparing to hopefully do a better job on the next 3.
Monday, October 15, 2012
Roadblock
In a busy life, it is a rare treat to be able to spend an evening playing games with a friend. It turns out that this last week was one. I was lucky enough to get a game in with my friend Zach again, this time it was to be Flames of War. The match was to be 1600 points, pitting my British armoured company against the German Panzerkompaine for some late war tank on tank action. Zach chose to play German, and selected a list consisting of StuG IIIs and Tigers, with SP artillery support. The british armour was a force of Sherman IIIs and Fireflies for additional antitank, with air support.
The British gains, however, came too little, too late. Despite making a decent account for themselves against two StuG platoons, a third arrived as reinforcements, and did just enough damage to drive another Sherman team from the table. This put the column below half strength, and without their company commander to lead them, they fled the battle with the Germans still in possession of the road.
British Armoured Column driving along a hedgerow road in Western France, right into a Wehrmacht trap! |
We played the Roadblock mission, and I was set to be the attacker, with Whitlow's Panzer Division defending. My armoured column had to secure a road though Western France along a small town among the hedgerows. The game would start with an ambush against one of my platoons.
Tiger Ace Whitlow takes aim at the Armoured Column's command section |
Wisely, Mr Whitlow chose to ambush my command platoon. With so few units in the game, this could cripple an army and force it to withdraw before they acheive their objectives. His heavy tank platoon sprung the trap, knocking out 3 of the 4 Shermans in the command team, and driving the fourth into fleeing the battle before the fighting even really began. At such close range, their armor had no hope of stopping the fearsome 88s shells.
Four to one, the Shermans rush the Panzer VI squadron |
The Sherman platoon ahead of the Company Command team on the road responded to the ambush, and raced cross–country to engage the Tigers head on. Between their combined firepower, they got a lucky shot through and managed to knock out one of the Tigers.
Our Hawker Typhoon looks absolutely NOTHING like a P-47! |
After an uneventful round the remaining Tiger wiped out the attacking squadron, but Allied air support came through and unloaded its cannon into the remaining Tiger, clearing off the objective it was holding.
The British gains, however, came too little, too late. Despite making a decent account for themselves against two StuG platoons, a third arrived as reinforcements, and did just enough damage to drive another Sherman team from the table. This put the column below half strength, and without their company commander to lead them, they fled the battle with the Germans still in possession of the road.
Thursday, September 13, 2012
Two if by Sea, or The Doctor is In
I recently had the pleasure of exercising my AWI figures in a game with Lord Z.E. Whitlow. We set up an amphibious landing scenario on my kitchen table. Not exactly a standard game table size, we had a playing field of about 3 x 7 feet, including about a foot and a half as water, featuring the HMS Sophie as transport, and a beached Dred Hawk
We used a slight variation on the Alamo rules by Warhammer Historical, to account for the range difference between muskets and rifles.
For the scenario, the Crown Forces were to begin on their transport ships and/or beach, and attempt to sieze a munitions supply in a nearby coastal town.
To oppose them, the local militia is called up, and aided with support from the Continental Army and French allied regulars. The British used the Texas Army list from Alamo, while the Continental force ran as a version of the Mexican army list, as it allowed for more of a militia presence.
In addition to the battle, we also ran a game within a game, since Mr Whitlow has an impressive Dr Who miniature collection. The Doctor would randomly land within the game, and pursue a creature though the battlefield, attempting to bring it back to the TARDIS.
Abhorring violence, the Dr tries to convince the men he's landed in to stop killing each other.
...but to no avail.
...while the Navy watched the battle, aloof on the harbor.
Subscribe to:
Posts (Atom)